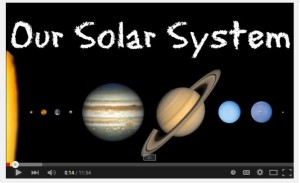
Here is a video that we watched in class to explore the basic facts of the Solar System! You can learn some cool information about each of the 8 planets! Use this video to complete your Interesting Facts chart in your packet. Click on the picture to watch!
We have begun our study of the planets in our Solar System. Earth is one of the eight planets in our solar system as defined by the International Astronomical Union. In your studies you will learn the current definition of the word planet, and why Pluto is no longer considered a planet, but now rather, a dwarf planet. Below is a basic outline of what we are studying. For this unit we will be focusing on the TrackStar web-based activities and the Planet Creation Project. Links to these sites are under PROJECTRESOURCES on the right aside of this web page.
Outline for The Solar System
Planets orbit the Sun at different distances.
Planets have different sizes and distances. Distances – How far from the sun, and its effects on temperatures Orbits – periods of revolution
The solar system formed from a swirling cloud of gas and dust.
Nebula
The inner solar system has rocky planets.
The terrestrial planets have rocky crusts. 1. Processes and Surface Features2. Atmospheres Craters cover the surface of Mercury. Volcanoes shape the surface of Venus. Erosion changes the appearance of Mars. 1. Surface of Mars2. Gases and Water on Mars
The outer solar system has four giant planets.
The gas giants have very deep atmospheres. Jupiter is a world of storms and clouds. Saturn has large rings. Uranus and Neptune are extremely cold.
This week’s assignment is to explore the following flash application available at this link here. Our goal is to analyze the graph and how the hours of daylight change over the course of year at various latitudes on Earth.
Answer the following questions on separate paper or the answer sheet in your
Chapter 2 Notes packet (page 8 or 10) .
This is to be used as background
for your WORM activity.
1) Examine the daylight hours over the course of the year for the town of Bourne. Use your internet skills to to determine the latitude of Bourne and then adjust the bar to that degree latitude.
When is the longest day of the year?
The shortest?
What days does Bourne receive 12 hours of daylight?
What is the most amount of sunlight Bourne receives?
The least?
2) Work with the animation, think about what you are doing, and then answer the questions.
At what degree latitude do people begin to experience 24 hours of daylight or night time?
Why does this occur on our planet?
What happens to the amount of daylight at the North Pole and South Pole (90 degrees North and South)? Describe why this occurs.
Adjust the latitude to at least two other latitudes.
Make sure one is in the southern hemisphere.
After analyzing the graphs, write a conclusion stating how the hours of daylight change as someone travels North or South of the Equator. What is the relationship between the following vocabulary terms and concepts?.
Be sure you use the following vocabulary words in your conclusions:
Play the game at home and record as much as you can about the behavior of the orange ball (the comet). Try to send the comet into orbit at different speeds to see what happens and ask how the comet interacts with different objects.
For example:
What happens as the ball gets closer to the objects?
What happens to the orange ball as the objects get bigger?
What happens when there is more than one object?
What effect, if any, does the speed of the orange ball have on its path?
Write a concluding statement summarizing what you learned.
What level did you reach?
Try to make the orange comet stay on the screen for as long as you can!
Click on the link below to get a worksheet you can use to record your observations, or simply write your own notes on a piece of paper.
We are beginning our study of Space Science, also called Astronomy. We will begin by exploring the various objects that man finds in the night sky, and try to grasp the size and distance of these objects. The class will discuss and watch a video on the early space explorations of man. The week will focus on the topic:
Exploring Space
Look at the objects below in the pictures. We looked at the photos and worked together to try to put them in order to answer:
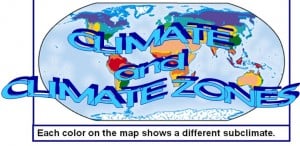
We are studying the factors that may affect Climate.
Click on the image above for the Climate Comparison Project guidelines and research pages. The link to the Notes pages is to the right of this web page under Classroom Notes.
Climate is the averageatmospheric and weather conditions of a location over a long period of time. We describe Climate in terms of two descriptions –
temperature and precipitation
The temperatures of a location can be affected by any of four factors, as shown below when we used the Smartboard Maps.
Remember, the Gulf StreamOcean Currentaffects us here on the south side of Cape Cod. The waters of Nantucket Sound and Buzzards Bay in summer are warmer than the cooler waters of Cape Cod Bay – remember this when you’re headed to the beaches this summer!
The precipitation of a location can be affected by either of two factors, as shown below when we used the Smartboard Maps.
Note the effects of the Prevailing Winds on the levels of precipitation. Global winds that blow across ocean areas bring moisture, such as the Trade Winds blowing into the Caribbean Islands and Southeast Asia. When the Trade Winds blow from south Asia onto northern Africa, they blow across land, bringing very dry winds and little rain into the Sahara Desert area.
The Westerlies blow across the North Atlantic Ocean bringing lots of moisture and rain to Ireland, England and Scotland!
Below is a diagram showing the effects ofMountainson the precipitation pattern of a location.
The side of the mountain facing the wind, the windward side, gets much more rain than the dry leeward side.
Effects of Mountains on Rainfall : Windward & Leeward
We have been studying the effects of unequal heating of the Earth’s surface, and the resulting wind patterns these cause. Land that is heated more directly absorbs more of the sun’s heat through radiation. The ground touches the air, and through conduction, heats the air – the air becomes less dense which causes it to rise. This creates an area of lower pressure in the atmosphere. As the air rises, it cools, becomes more dense, and then falls back to the earth, creating an area of higher pressure. The movement of the air creates a convection current.
AIR ALWAYS MOVESFROMAREAS OF HIGH PRESSURE TO AREAS OF LOW PRESSURE.
Moving air is called WIND.
Global Winds
The spinning of the Earth causes the winds to bend to the right as they move across the globe. We call this effect the Coriolis Effect. Global Winds are winds that move across large areas around the globe. There are three major Global Wind Belts – the Trade Winds, the Westerlies and the Easterlies. These wind belts are found in both the Northern and the Southern Hemispheres. There are also areas of calm winds, called the doldrums near the equator, and the Horse Latitudes nearthe 30 degrees latitudes. See the diagrams below.
Local Winds
The same convection currents that cause the Global Winds also affect the atmosphere at the local level, especially at the seacoast. Here on Cape Cod we experience these local winds during the summer. Cape Cod is kept cool, sort of a natural air-conditioning, by the local sea and land breezes. The hot summer sun heats the land on Cape, causing the air to rise (low pressure). Cooler descending air from the water (higher pressure) rushes in to take the place of the rising warm air on land, forming a cooling Sea Breeze. This keeps the Cape comfortable on most summer days. At night, the land cools down much faster, the warmer ocean water heats the air, causing the air over the water to rise. Cooler air from the land moves in to take the place of the rising are, creating a Land Breeze.
Study the diagram below, and then CLICK on it to see the animation!.
Both Global Winds and Local Winds are caused by the unequal heating of the Earth’s surface, creating differences in air temperatures and air pressures.
Air (wind) always moves from HIGH pressure to LOW pressure.
The Electromagnetic Spectrum is the entire range of wavelengths that are found in the solar radiation that reaches the earth from the sun. It consists of many different sizes of waves (wavelengths) that represent different energy levels in the waves. There are three basic kinds of electromagnetic waves:
Infrared Waves – Longer than the red wavelengths
– low energy
Visible Light – the waves of radiation that we can see
R O Y G B I V
Ultraviolet Radiation – Shorter than violet wavelengths
We are studying the Layers of the Atmosphere as we start our new unit. In our graphing lab activity we learned that the temperature of the air definitely changes as we go higher in altitude…but it does not always go down, as you may think! Each of the layers of the atmosphere is defined by a Change in the Temperature Direction. The chart below shows the changes as we graphed them in class.
Remember your Silly Sentence to recall the layers in order:
T S M T I E
or
The Sun Melts The Ice Everyday!
The Aurora Borealis, also know as the Northern Lights, are caused by the sun’s high energy radiation ‘charging’ the air molecules in the Ionosphere, causing them to glow. This happens near the North and South Poles, as the Electromagnetic Field is less strong at these points.
The Northern Lights are one of nature’s most spectacular visual sights, and in this speeded-up video from National Geographic Videos, they provide a breathtaking display of light, shape, and color over the course of a single night in Norway.
And finally, for some fun, here is the link to the Classroom JigSaw Puzzle we did today…
We have been studying the ways that heat can be moved form one substance to another…through the three types of Heat Transfer – Radiation, Convection and Conduction. For an animation review of what we did in class, click on the picture.
In the diagram below you can see how each of these types of heat transfer is represented in the picture of the boiling water. Radiationfrom the campfire travels through open space to heat the pot. The pot then conductsthe heat through direct contact (touch) to heat the entire pot and handle, as well as the water inside the pot. As the water, a fluid, gains heat energy, the molecules of water become more agitated and move more quickly, becoming less dense. The warmer water then rises to the top of the pot, where it hits the air, cools, and then contracts to become more dense. It then sinks to the bottom of the pan, where it is heated once again. This forms a convection current in the pan.
In the atmosphere, the same three types of Heat Transfer take place…Radiationfrom the sun heats the ground. The ground then touches the air, and through this direct contact, conduction, the air is then heated. As the warm air becomes less dense and molecules move farther apart, the warm air rises through convection. When it reaches the upper levels, the warmer air cools, contracts, becomes denser, and then sinks back to earth. It then gets heated by the ground one more time, and the repeated actions form convection currents.